Kleancolor Neon Pink and Sally Hansen Fuzz-Sea

Tuesday, June 18, 2013
Hello polish lovers!!! I know it has been almost a month since I have posted anything, I’m sorry, I truly am. I have just been real busy with life and I had to make a drastic decision, one that I dreaded to make ….. but had too. I cut all my nails off and shaved them down to tiny nubs!!! (the horror) I had to do this due to the fact that I got a personal trainer at the gym and kept on chipping or pulling my nails back.

Anyways… here is a quick post.

This is Kleancolor’s Neon Pink. This is a bright creamy pink that took only 2 coats to get a nice even surface. I really do love this brand, the consistency of the formula is always on point.


I was able to find the Sally Hansens Fuzzy Coats at my local Walmart the other day and decided to pick two up. This is Fuzzy-Sea, a light blue and yellow bar glitter in a clear base.


Don’t judge my nubs please lol.


Thank you, and hope to have another post for you lacquer lovers tomorrow!!!!

Stringing/ Sugar Spun nails with Gold flakes.

Thursday, May 23, 2013
Hello there readers, today I have a nail art type post. I have been seeing this nail polish technique resurface on instagram so I wanted to do a mani with it.

When I first heard about it, it was called “Stinging.” What you do is put a few drops on polish on a piece of paper and wait for it to get thick and stringy, then dip a toothpick or dotting tool and pull the stringy nail polish on to your nails. Here is a link to Hookedonpolish31’s Youtube video on the Stringing technique.

I’ve done this type of mani before some time last year and decided to give it another try. Now people are calling it “Sugar Spun” mani. Here is a Youtube video by KatStaysPolished on how to do the Sugar Spun mani.

I decided to use this SinfulShine GelTech polish in Dark room and a Wet n Wild Chrome polish in A Show at the Palladium.


I knew I wanted to add another element to my mani so I decided to add some gold leaf foil to it. I got this stuff at Michael’s some time ago, and use it for nail art. The way you apply it is real simple. Let your basecoat dry then take a few pieces of the foil and attach them with a drop of clear top coat. Then once you have placed all of the ones you want, seal it with a top coat.


Here is the end result. I added a top coat to the Sugar Spun nails so my mani could last longer. I recommend not adding one so you can see the effect of the technique, but I knew I wasn’t going to have time to do my nails in a few days… so the top coat was a MUST for me.


Hope all of you like!

My DIY Lightbox!!!!!

Monday, May 20, 2013

Hello there awesome people, hope all of you had a great weekend.

Remember how I said I was going to slowly improve the quality of my pictures?! Well this weekend I managed to get some time to make a lightbox. I have wanted to make one for some time now but I always seemed to get distracted. I was able to find a box at work that I knew was a perfect size for what I wanted to make. Yes I know.. it’s a Durex box, I work in the health field.

I searched online for a simple tutorial and I found one on one of my FAVORITE blogs, Chalkboard Nails. On my way home I stopped at the Family Dollar and picked up a pack of tissue paper for $1 and a pack of multi colored poster board also for $1. They didn’t have the large poster board like I wanted, but I made due with what they had.


I went home and followed this Chalkboard Nails tutorial. Only thing I did different was that her tissue is taped to the outside, and I put mine on the inside. I didn’t want any of the brown cardboard showing so I did it my way. One thing I still need to get is the two lamps that I plan on picking up on my way home for lunch today.


I was so proud of the end result!!!! My boyfriend wanted to build me a proper one but I think this will do for now. It’s simple and weighs nothing do I can put it on my glass desk my boyfriend bought me from IKEA for my birthday.

Expect better pictures in the near future! No more taking pictures in my restroom or at work lol.

Glampaint Lacquer- Barbie's Jeep

Monday, May 13, 2013
Every now and then I spend a good amount of time on Instagram looking for new people to follow, or new indie brands to spend my money on. I do want to add that this is something that can get you in trouble. I managed to spend a RIDICOULOUS amount of money one month just trolling IG and buying every polish I saw that I liked.

A while back I came across a special promo sale for a brand I had never heard of before. Glampaint Lacquer, I went to the website and was hooked on the polish I saw. I ended up ordering three, but I have only tired out one of these so far. So here is the main one that caught my attention.


This is Glampaints Barbie’s Jeep. This milky pinkish-purple base with large silver holo hex and smaller blue and purple glitter is amazing. I loved the combo that the owner put together. It’s a very girly polish and it only took two coats of this polish to create this even look.


Follow her on Instagram or on Twitter.

Candy Lacquer Haul!!!

Hello here people. Sorry I haven’t posted in a few days. I’ve been really busy with work and all. I had two posts I was getting ready to publish but never seemed to finish them in time. So here is one of them.

As many of you have read in past posts, Candy Lacquer is one of my all time favorite indie polish brands. The stuff the owner comes up with is amazing. I haven’t found another brand with stuff similar to hers. It’s simple, yet amazing at the same time; all her polishes are in a clear base coat. I prefer clear base coats this way I can layer them on top of what ever color I think looks good.

Last week I noticed that her shop was open and that the polish I had been wanting that was previously sold out, was back in stock with a few new ones. I immediately ordered 3 (my spending limit) that caught my eye.


Here is Sumer Circus, Graffiti Sweetie and Pixel Party. Summer Circus to me looks like the perfect Easter, spring color that is full of large and medium hex in pastel purple, green, yellow and coral.


Next up is the one polish I have been after since it first came out and sold out before I could get my hands on it. This is Graffiti Sweetie. This polish is jam packed with neon pink, blue, and limes colored hex and some bright red hearts. It also has a bit of multi color small square glitter and some black bar glitter also. I am IN LOVE with this polish and can’t wait to use it.


Last but not least it Pixel Party. This reminds me of Tetris or legos, it is a multi colored square glitter. This polish is just that.. a PARTY in a bottle.


There are the links to Candy Lacquers online shop and to her Facebook. Make sure you like her page for more info on when her shop will be open, and what new creations she will have.


Deborah Lippmann Mermaid's Kiss, Do The Mermaid and Sinful Colors In The Spotlight.

Tuesday, May 7, 2013
Hello lovely people!!! I have another armature post for all of you, and again, I plead that you are patient with me on this blogging thing. I promise to take better quality pictures of my nails and nail polish. I’m thinking of building a light box tomorrow since I have the afternoon off, and am looking for a better camera.

Anyways…. Todays mani is brought to you by my awesome boyfriend. I had tagged him on an Instagram picture someone posted about the new Deborah Lippmann Mermaid Collection. I told him I “HAD TO HAVE THEM” because I didn’t have any DL or any kind of polish like it. I came home last week to a bag on the bed from Nordstrom’s, and in the bag were two Debra Lippmann’s and the Chanel Holiday I already reviewed. I was beyond ecstatic when I opened the bag and saw what was inside.

Last night after coming home from another 13 hour shift, I decided to give these babies a go. I had something awesome planned but I was too tiered and a bit cranky to crank out something amazing. Eh it is what it is, lost my inspiration by the time I got my base coat on lol. Here are the 3 polishes I used for this mani.


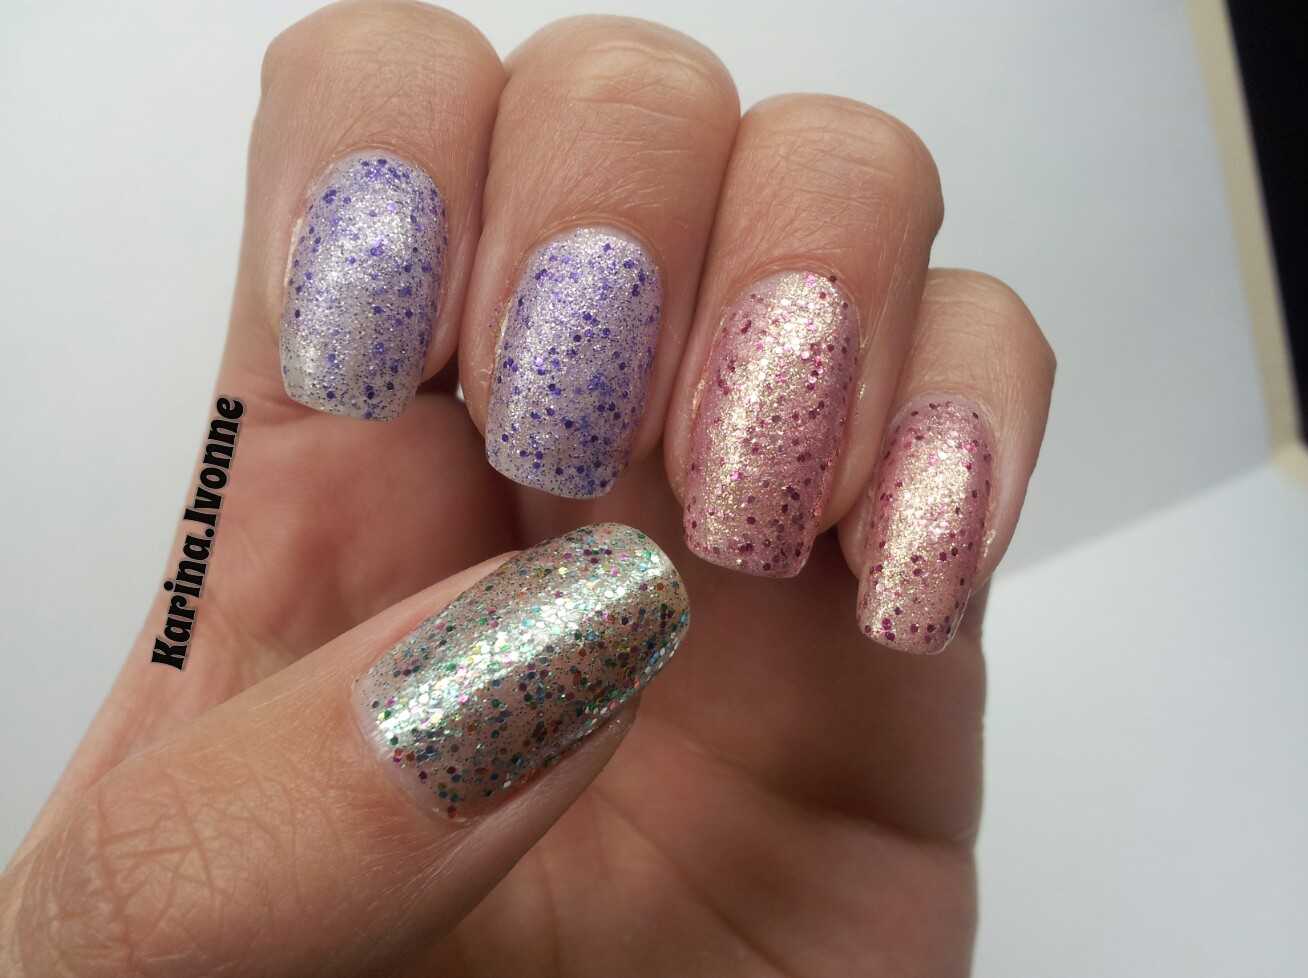
The first is Mermaid’s Kiss, this polish is a slight milky base with tones, of blush, dusty pink, gold and a sort of raspberry tone to it. I could not get a good shot of the vast dimension of color this thing gives off. Even though it is a glitter shimmer polish, it took two coats to get a solid opaque look. The formula and glitter glide on with ease and isn’t chunky or sharp like I have noticed with some micro shimmer polish.


The next polish is also a part of the Mermaid Collection called Do The Mermaid. This is also a slight milky base with lavender glitter, and silver micro shimmer. I recommend 3 coat to get a nice opaque look with this polish, or using a similar shade as a base coat. My favorite color is purple, so this is my favorite of the bunch.


The last polish was suppose to be a substitute for the original Mermaid’s Dream since I don’t own it YET, but I found that the glitter was bigger and the formula was jam packed with micro shimmer but didn’t have a milky base. This is Sinful Colors In The Spotlight from their almost Famous/ Paparazzi collection. (check them out here on Nouveau Cheap) It has a green micro shimmer with dusty pink, orange, gold, silver, and a sea green tiny glitter. Love the color, but no milky base so I recommend a nice base color to go with this. They say this is a close dupe to China Glaze Optical Illusion.


The next two pictures are just shots of the actual mani. I tried making my own back drop at work with two sheets of paper lol.


Icing Minted and Naild'It Unique Polish

Monday, May 6, 2013
Happy MONDAY!!!! Hope all of you had a great weekend. I spent mine working but it was still a good weekend. Today I have another rushed and smudged mani for yall. I was extremely tiered last night, but I got the energy to do my nails while my boyfriend finished working on some stuff he had going. Remember how I told yall that I did a mini haul at Icing? Well this is one of the polishes I picked up from there.

This is Minted by Icing. Sorry I didn’t take any pictures before I added the glitter. I used a new base coat that didn’t agree with this polish, and I didn’t feel like taking it off and starting over again. The formula on this super bright, day glow polish is as expected. A nice cream which would have been a 2 coater if my base coat wasn’t making it streak and clump. This is a super lime neon color that has already attracted a lot of attention here at the office. I’m really feeling these neon’s and Icing has TONS of them for this season.


I knew the right glitter to top this polish off with and have really been anxious to use it since I got it like 2 months ago. This is Lego No Way Yo by Naild’it Unique Polish. She is on blogger too, so check her out here. This polish is a jam packed multi size, multi glitter polish. It has micro multi colors with hex and medium, large square glitter. This is a one coat glitter application. The bottle is straight glitter with no fishing required. I thought it paired nicely with the neon mint color, only thing is that I didn’t wait for it to dry all the way before I went to bed. I recommend adding a thick top coat to this polish due to the simple fact that the square glitter doesn’t lay flat on your nails. I have some sharp edges exposed that are starting to curl up. A top coat would of fixed that, and I might add one later today so I wont loose any more squares.


Here are two different pictures of the polish in different light. One is in my office, and the other is in my car while I was sitting in traffic. You know… now that I’m looking at them, they kind of remind me of jaw breakers. Lol.